

How To Create A Custom Header For Excel 2007 Spreadsheet

If you are using Microsoft Excel 2003 and below, you’ll know that adding a custom header to your Excel spreadsheet requires you to work with a separate Page Setup window. With the introduction of Microsoft Excel 2007, you are able to work with the header directly on the worksheet itself, just by going to your Page Layout view.
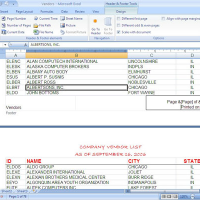
I’m going to show you here how to create a typical header with the title “Invoice” in the center, your company’s logo at the left margin and the date inserted at the right margin. Just follow these steps below:-
- Click the View tab and then click Page Layout in the Workbook Views group.
- Click on the word Click to Add Header above row 1.
- Type Invoice (for your title)
- Click outside the box to the left of the title.
- In Header & Footer Design Ribbon, click Picture in the Header & Footer Elements group.
- Browse to the file containing your company’s logo, and then click Insert.
- Click any cell in the worksheet.
- Click on the logo.
- In Header & Footer Tools Design Ribbon, select Format Picture in the Header & Footer Elements group.
- Format your logo size and alignment as you like, then click OK
- Click to the right of the worksheet title near the right margin.
- Click Current Date in the Header & Footer Elements group of the Header & Footer Tools Design tab.
- Click in any cell to exit the Header/Footer mode.
You can perform similar operations to create a footer for your worksheet. To access the footer area of your worksheet, click anywhere in the header, then click Go To Footer in the Navigation group of the Header & Footer Tools tab.

How To Create Custom Header For Excel 2007

 Leave a Reply


All Rights Reserved • Powered by juzzhost | Founded by Delson Moo